
Tabletop Officer Training Corps: Figure Preparation
Wednesday , 18, January 2017 Tabletop Games, Wargames 1 CommentWelcome back, grognard-in-training. Last time we discussed the decision process you follow when choosing a new wargame project. This time we discuss the first steps in constructing your wargame. After you’ve run through the iterative process of choosing figures and a ruleset, and have the figures themselves in your hot little hands, it’s time to start assembling your forces. To do that, we’ll need a few supplies, some of which you might already have around the house.
As my moniker suggests, the starting and ending point of any wargame is the box. Your game will live in your house for years to come, and you want to make sure that it fits in your home in a way that is unobtrusive and that won’t risk damage to the components. For my own Three Musketeers project, I picked up a cheap plastic tub sure to hold both figures, rules and terrain measuring 13 inches by 16 inches with a depth of 6 inches. Remember that my game is built using the 15-mm scale figures and I’ve only got to store twenty to thirty of them. My terrain need not be any more than three feet across. If you are using bigger figures, are basing massed troops on larger bases, or want to cover more table-space, you’ll want a correspondingly larger box.

Your own war in a box starts here
You also need a box of ¼-inch diameter washers, priming paint, craft glue, super glue, and an X-Acto knife. All of these will be used to mount the figures on a base suitable for storage and play.
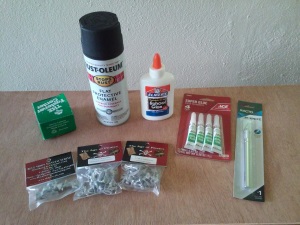
Your first supply run should cost less than $20
As you see, can my figures have two problems at this point. The molded base it too narrow to support the figure during play. The masked highway man shown here is likely to tip over, and he has a couple of strange bits of metal stuck to him.
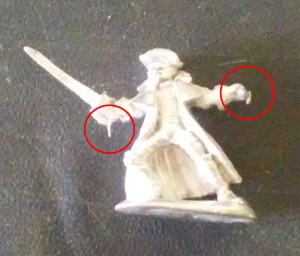
This highwayman needs a little attention
Those bits of metal are called ‘flash’ and they are a result of the casting process used in the manufacturing of miniatures. You may also see mold lines, perfectly straight lines running up and down the figure. Those are also a result of the injection molding process. The higher quality manufacturers will have less flash, but it’s unavoidable. Fortunately, they are easy to trim away with the X-Acto knife. Here’s another example of a bit of flash that peels away with a flick of the knife.
With the flash trimmed away, you’re ready to fix that second problem of the narrow base. All it takes is a dab of superglue and a standard sized washer. When you go to the store, you’ll want to bring along a few examples of your figures to check the diameter of the washers you buy. The last thing you want is to get home and find your figures overhang the base by even a few millimeters. In scale, those few millimeters will look huge, and will break up the nice clean line of the figure base. Any superglue will do for this step, but in my experience paying more doesn’t yield any better results than the inexpensive superglue.
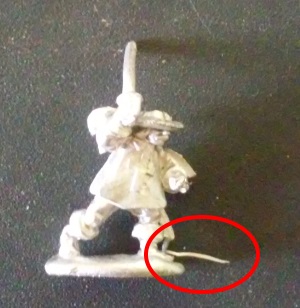
Another example of the molding process
You can buy fender washers – those are washers that lack holes in the center – to avoid this next step, but if your local store doesn’t have any available, that’s no problem either. After the superglue dries, you can fill in the small gap between the figure base and the washer with a small dab of craft glue. At this point you have a decision to make about the final look of the figures. Normally, I liberally apply craft glue to the whole base of the figure and then cover it with a layer of very fine sand. When it dries, it can be painted brown and green to look like natural earth. That also serves to hide the step-like transition between the washer and the figure base.
In this case, I’m opting for a less ‘realism’ and more ‘gamist’ look. To help aid the players in identifying factions, my bases will be painted in a solid color, with perhaps a small icon designating the figure’s identity. We’re getting a little ahead of ourselves here – we’ll cover painting the figures in the next post – but as with any construction project, you always want to look ahead to make sure you are headed in the right direction.
Once the craft glue dries, you are ready for the ultimate step before applying paint to your figures, the base coat. The plastics and metal alloy manufactures use to make these figures are designed to provide maximum detail at the most efficient cost. While these figures are designed to be painted, they are not designed to hold paints. That’s another byproduct of the manufacturing process, but it’s a happy byproduct, because it gives us the leeway to choose our own style of canvas. To get your bright colors to stick, you’re going to have to spray paint the figure with a primer, just as you do when painting any other surface.
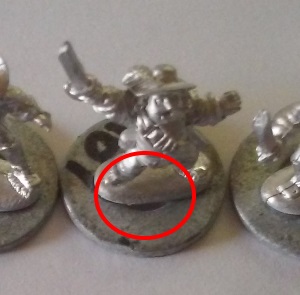
A dab of PVC will patch that right up
Several miniature wargame supply companies make spray primer. Games Workshop, for example, sells a line of spray paint in colors specifically designed to match the unit colors in their Warhammer 40k products. They are fine primers, but a little pricey. You can buy a primer from the local hardware store for a third the price. The more expensive brands of paint dry a little smoother and a little thinner. That might be important for high-quality museum pieces or for bragging about your elite painting skills on the internet, but we’re building a rugged set of game pieces here. The extra quality will be lost at arm’s length and in the thrill of battle, and the extra cost means one less figure or unit to shove into battle.
There are two non-negotiable criteria for your spray primer. The rfirst is that it must be FLAT finish. Some primers come with a satin or eggshell or glossy finish. Those won’t work for our purposes as the chemicals that provide the fancy finishes repel the acrylic paint we want to apply. Only a flat finish product will allow paint to stick to the figure.
The second non-negotiable is that you have to follow the manufacturer’s safety recommendations. For safety’s sake, spray your figures outside or in a well ventilated room. Some wargamers build a dedicated spray box complete with vent fans, but all I’ve ever done is wait for a nice day, throw my figures on a clip-board, and take them outside to a location where I don’t have to worry about wind blowing the over-spray onto my neighbor’s vehicle. After 20 minutes, they will have dried enough to bring them inside the house.
What color primer to use is a wide open topic, and largely depends upon the final figure. We’ll talk more about primers later when we discuss the different painting techniques. Generally, white primer provides bright, bold colors, but makes shading figures more complicated. Black primer makes it harder to get bring colors, but allows for the deep shadows that really highlight the three-dimensional character of your little fighting dudes. Some grognards swear by gray primer as an effective compromise, but I’ve never had any luck with it. On the other hand, I’ve used green primer as the base for frogman-monsters and brilliant blue primer on space-ships to save the step of re-painting the figures’ skin or hull tones.
My strong recommendation is for black primer. In the next class, we’re going to start painting our figures. The technique we use will provide outstanding results right out of the gate even if you’ve never painting a figure before in your life. This technique is predicated on having deep, dark shadows and those are most easily obtained by starting with a flat black undercoat.
Primed and ready for some brush action
These first steps might not seem like we haven’t accomplished much. As mentioned above, building your own wargame means you are a builder, and that means prep-work is vital. Ask any carpenter and he’ll tell you that driving nails is a small part of any project. Choosing the right lumber, cutting it to size, and laying it out take far more time than the actual assembly, but if you short change those steps, you’ll be in for a world of hurt later on.
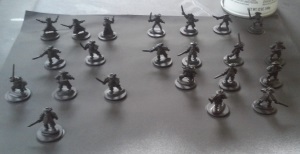
These Musketeers, Cardinal’s Guards, and highwaymen might not look like much now, but we’ve laid the foundation for brilliant things to come. And with just an extra 20 minutes of effort, we’re that much closer to re-enacting the thrilling tales of Dumas, or Tolkein, or Burroughs, or our own fevered imaginations.
Good post which will prompt me to finally research and invest in a good carry case / storage for my armies.
I recommend the novice spends time in exploring different rule sets, or at least the rule set one can get the most games with, depending on local tastes as the basing scheme can be radically different. This is especially true for larger games using formations as opposed to Jon’s Three Musketeers which will probably be moved individually.
Once I arranged a game and bought my favorite units only to find that my basing scheme didn’t fit in with the Hordes of Things rule set. We ended up using my opponents figures.
That being said miniature gaming is nothing but abstraction so unless you are playing with an overly pedantic opponent I find that some adjusting of measurements works.
Magnetic basing is more expensive but allows one to easily remove figures from a moving tray or row.