
Tabletop Officer Training Corps: The Grow or Die Edition
Wednesday , 8, February 2017 Tabletop Games, Wargames 1 Comment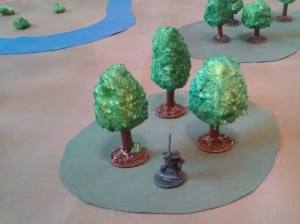
A lone musketeer patrols a small copse of trees in the King’s forest reserve
Last session we explored a quick and easy way to get game ready terrain for your miniature wargame. Today we’re taking things into a whole new dimension – the third dimension, to be precise. Once again, our focus will be on a few key items that add visual interest, force player choices, and won’t break the bank or drain your precious free time. We’re going to turn our flat patches of “forest” into actual forests complete with trees. If you prefer skirmish gaming, you can also skip the dark green boundaries of the forests, and just use the trees themselves as individual terrain items.
Altogether, adding ten trees and a lot of hedge fences takes about two hours of time, and costs less than ten bucks. A little more if you don’t already have a glue gun, but by the time we’re done, you’re going to get lot of mileage out of that glue gun, so don’t be afraid to spring for a decent one.
The supplies you need consist of:
- a wooden dowel roughly 1/8 to ¼ inch in diameter for the trunk of the trees
- a pair of steel washers for the base of each tree – take your dowel and try to fit it into the hole in the washers
- One stiff yellow sponge for the foliage
- Loose sand from the local beach, sandbox, or even driveway
- And if you don’t have one already, a glue gun with glue-ammo.
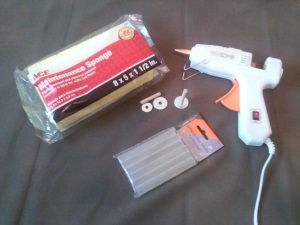
Basic supply list
While you’re securing these supplies, grab a pack of green kitchen scrubbers as well. As a bonus terrain item we’re going to make more hedges than we need. Hedges are one of the cheapest and easiest ways to craft linear terrain obstacles, and they work in most non-urban settings.
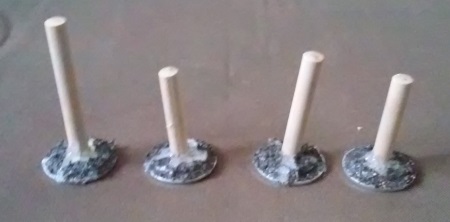
The assembled trunks ready for some greenery
To assemble your trees, simply use the glue gun to stick the dowel through each pair of washers as shown. The glue gets stiff in no time, and hardens just right for root structures. After that glue dries, fill the crack between washers and the flat spaces between roots with white craft glue and sprinkle on a touch of sand. This will hide the gap, and make the base look more natural. The washers are doubled to give the base more weight – when your fellow grognard bumps the table, you won’t have to worry about the forest falling over. Spray the whole assembled piece brown, using the paint you bought for the drop cloth, and you are ready to add some foliage.
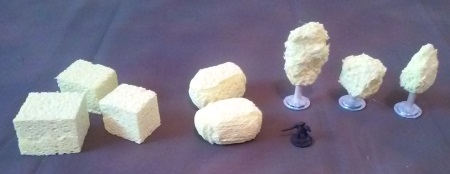
The three steps to creating foliage
The foliage is simply one cut up yellow sponge. Cut the sponge into enough one block for each tree, trim the hard corners off, and then rough up the sponge using the flat edge of your scissors, or pull at it using tweezers or needle nosed pliers. Once you’ve got a nice fractal tree effect, just spray paint each ball with the green paint you bought for the ground cloth. As you can see, if your sponge is yellow, you don’t need to coast the entire thing green, as the yellow gives it a more natural look.
At this point, it’s a simple matter to use your hot glue gun to fix the leaves in place on the tree trunks. Make a cross-shaped incision in the base of each tree deep enough to hold the foliage ball, and the tension of the sponge will hold it in place until the glue dries.
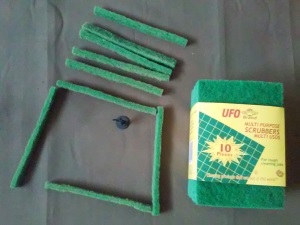
One pack of ten of these is enough to make sixty-feet of hedges.
As a bonus terrain feature, let’s build a few hedges. Take one of the green scrubbers, cut it into strips about half an inch high, and then dust each one with a bit of yellow spray paint. That’s it. You’re done. For larger figures, you may want to glue each hedge to a craft-stick base, and add some sand as we did with the tree’s bases. You can even fold the hedge in half before gluing it down to give it more thickness. To get just the right height for the hedges, ignore your ruler and use a figure for reference. Alternatively, you can make hedges in two sizes, the short ones that delay movement, and hedges taller than a man is tall to block both site and all movement. Eventually, you can add small wooden gates and sign posts to the hedges for added visual interest, but this five minute exercise is all you really need for plenty of linear obstacles.
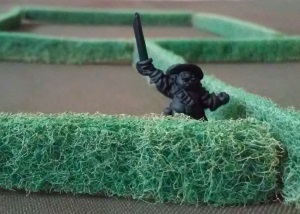
Porthos standing guard over a small meadow.
Now you’ve got water hazards, woods, hedges, roads, and that’s all you really need for terrain. From here on out things get a little more complicated, but if you’ve come this far, you are ready to add even more little touches that will make your table really pop.
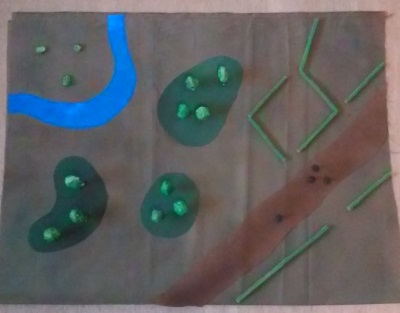
One of the infinite permutations of the completed terrain
I’ve never heard of using a sponge before to create foliage but your picture shows that it does the job. Also using scrubbing pads for hedges. Good stuff.
Less expensive and after the battle there isn’t green plastic debris left behind from the railroad model type trees.