
WARGAME WEDNESDAY: Avalon Hill’s The Battle of the Bulge (1981) – Part V
Wednesday , 3, January 2018 Wargames 1 CommentPlay 4 | Allies – Dad/Axis – Me | Outcome – Overwhelming Axis Victory (Allies concede Antwerp Victory as inevitable)
This playthrough we used the following:
- No roll for Paratroopers
- No roll for 150 Commando
- 2x SS Panzer Divisions can participate in morning Blitz
In some ways this was very similar to my strategy in Play 3, but in other ways, I tried doing things very differently. I also had a very lucky opening turn.
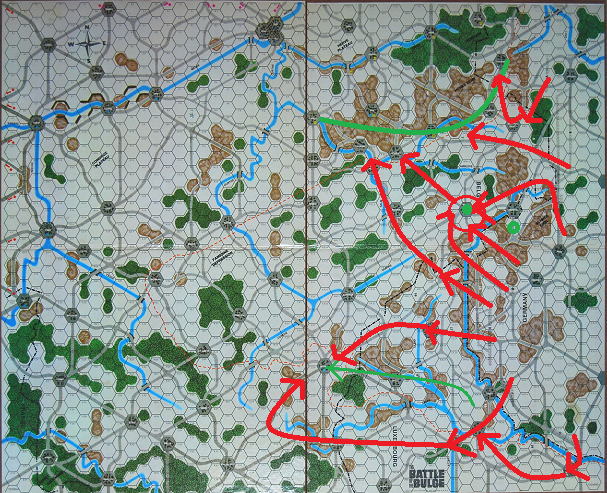
First turn, the Sixth Pz scored several overrun victories, achieving massive odds by concentrating attacks on a single point along the road, which would open the board for me on turn two. The Seventh Army did its thing, basically keeping the early van of Patton’s forces off the map. Fifth Pz lucked out with some really good rolls. Over half of the attacks turn one were exchanges, meaning I could sacrifice one 3-3 wehr inf for a 4-4 light tank or 5-4 infantry. At a point in the game where the Allies are hurting for numbers, an exchange is a huge blow. The best outcome for Allies turn one is getting a retreat result that will put them in a city where they can dig in. That will delay the Germans for at least one more turn. With an exchange result, there’s just nothing between the German tanks and the Meuse for several turns and they get to run to the tables on the Allies.
The biggest difference in this playthru was I went all out against the north. Once the Fifth Pz broke through, instead of sending them toward the Meuse, I sent them north to help the flanks of the Sixth Pz’s advance. Sending infantry from the LXVII through the woods at the north, the Sixth was able to trap most of the forces around Elsenborn Ridge between infantry to the north and SS Panzers to the south, while the LVIII & XLVII Pz circled up capture the supplies at Spa and Stavelot.
I had enough free mechanized units to take the towns on the northern Meuse while hammering the Allies on the ridge. Allied airborne reinforcements were able to isolate a few pockets of troops along the Meuse, but couldn’t capitalize on it. By the end of the 19th, I’d managed to do the unthinkable—I’d consolidated the German Northern Flank; if the German player can take certain objectives from Eupen to the bridge north of Spa, the Fifteenth Army will move on Aachen, canceling all of the Allies Ninth Army reinforcements. My dad says this is the first time he’s ever seen that happen. One of the reasons why this is huge, the cancelling of the Ninth Army reinforcements means that the Germans can reroute virtually all of their troops from the North edge of the board between Liege and Eupen and redirect them towards the Meuse. So, these troops were able to deal with the handful of airborne troops south of Huy cutting off the Panzers along the Meuse. Sheer lack of numbers meant that the Allies couldn’t cover all supply routes, and an armor division that had been rampaging around north of the Meuse between Namur and Huy was able to trace to Bastogne.
About a day and a half before Montgomery was going to arrive, most of my panzer divisions were either surrounding crushing airborne brigades, punching into Liege, or marauding north of the Meuse. I’d consolidated my divisional artillery, so I could hit just about any battle with 20+ and get the heavy bombardment bonus. If we’d continued, I’d be able to move off my 12 mechanized units, cancelling all of the British reinforcements while still having enough to mop up the Allies on both sides of the Meuse. Figuring that the three divisions Patton was going to show up with were not going to be enough to cut supplies to the Sixth Pz Army while dealing with a fully intact Fifth Pz and Seventh Army, my dad conceded that I’d won an Antwerp victory without playing it out.
The opening was similar to the previous game. I made certain to eliminate all resistance in the south and center as quickly as possible.

The biggest difference, however, was instead of sending forces southwest and center, I sent as many troops as I could, artillery especially, north to join in the push against Elsenborn Ridge. While I did make certain I had troops to meet the airborne reinforcements, I instead went all out to be certain to capture supply dumps then see the 15th Army offensive was launched, cancelling a boatload of reinforcements. However, to avoid crowding bad terrain, mobile units pushed towards the northern Meuse. Massive artillery fire let me make big pushes northward, and the Panzer armies from south and center worked to pick off the airborne troops.
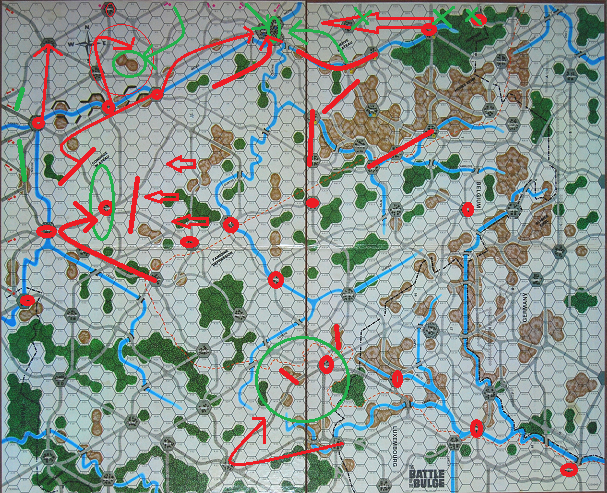
The game was done before Patton even arrived in force. I’d had a TON of guys guarding a couple key points, with just enough mobile forces to create massive problems for the troops trying to encircle Bastogne. I encircled and destroyed most of the troops north of the Meuse, and the troops west of the Meuse were trapped. Infantry were pushing their way west toward Liege, and I could bring tons of artillery on most attacks. I was about to cancel all British reinforcements, and even with four armored divisions off-board, there was no way that Patton alone would be able to challenge my supply lines in time to cancel an Antwerp victory.
This has really been a fascinating series of articles. Thank you for walking us through the theme and variations on this classic game.